|
|
|
Porsche, and the Porsche crest are registered trademarks of Dr. Ing. h.c. F. Porsche AG.
This site is not affiliated with Porsche in any way. Its only purpose is to provide an online forum for car enthusiasts. All other trademarks are property of their respective owners. |
|
|


| Speedo |
 Mar 30 2026, 06:09 PM Mar 30 2026, 06:09 PM
Post
#1
|
|
Senior Member  Group: Members Posts: 583 Joined: 7-November 06 From: Boulder Member No.: 7,170 Region Association: Rocky Mountains |
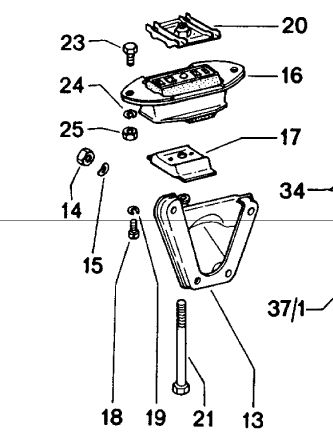
I'm ready to buckle up my engine into my six. I'm ready to go except...I can't find schematic in my parts pdf that shows all the hardware. I have the mount on the engine, the female half on the chassis with the top and bottom plates, the 135 x 12mm bolt. My question is about nuts and washers. I assume there is a heavy washer at the head (bottom) of the bolt that touches the bottom of the mount on the engine. Is there a lock washer in the system, and is there an additional nut and washer on the bolt that sticks through the top of the mount? This is what happens when you take a car apart and wait ten years to put it back together...in addition, the longer the time between disassembly and reassembly, the more time the shop "trolls" have to hid stuff on you. Ask me how I know....
|
   |

 
|
  |
Replies(1 - 8)
| mskala |
Mar 30 2026, 07:19 PM
Post
#2
|
|
R Group: Members Posts: 1,942 Joined: 2-January 03 From: Massachusetts Member No.: 79 Region Association: None |
No washer for the big bolt
 |
|
|
|
| colingreene |
Mar 30 2026, 07:42 PM
Post
#3
|
|
Senior Member Group: Members Posts: 752 Joined: 17-October 13 From: Southern California Member No.: 16,526 Region Association: Southern California |
i have a pretty nice replica of a factory mount if you are looking for one.
|
|
|
|
| Speedo |
Mar 31 2026, 07:44 AM
Post
#4
|
|
Senior Member Group: Members Posts: 583 Joined: 7-November 06 From: Boulder Member No.: 7,170 Region Association: Rocky Mountains |
QUOTE(mskala @ Mar 30 2026, 05:19 PM)  No washer for the big bolt Huh. So bolt basically bolts up through 13-16-17-20 with no lock washer at all? What is to keep it from backing out? Thanks for responding! |
|
|
|
| rudedude |
Mar 31 2026, 07:52 AM
Post
#5
|
|
Senior Member Group: Members Posts: 555 Joined: 1-January 05 From: minneapolis, mn Member No.: 3,387 Region Association: Upper MidWest |
Part #20 has a split lock nut, at least on mine, welded on that plate.
|
|
|
|
| Superhawk996 |
Mar 31 2026, 08:22 AM
Post
#6
|
|
914 Guru Group: Members Posts: 7,767 Joined: 25-August 18 From: Woods of N. Idaho Member No.: 22,428 Region Association: Galt's Gulch |
Lock washers are less than worthless.
Bolt stretch is what keeps any fastener from loosening and backing out. Torque bolt to spec with a torque wrench and you’ll be fine. If you want belt and suspenders use blue locktite. Per NASA fastener design manual 1990 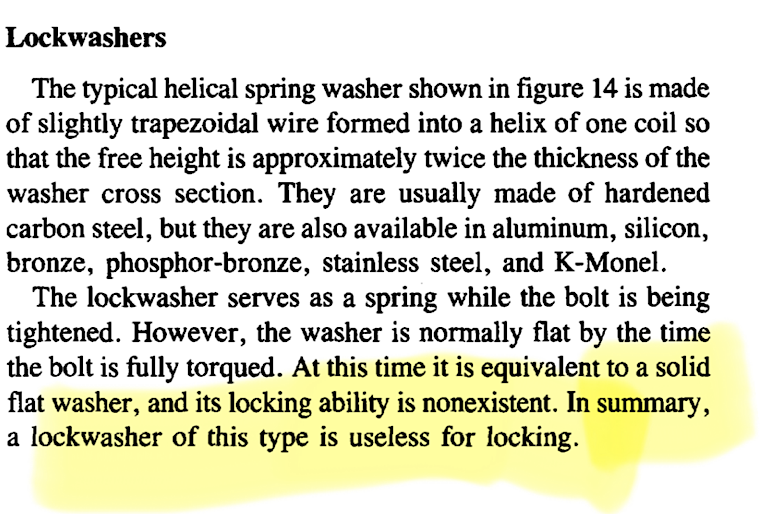 Modern automobiles do not use split ring lock washers, they just add unnecessary weight and decrease reliability. |
|
|
|
| gereed75 |
Mar 31 2026, 09:05 AM
Post
#7
|
|
Senior Member Group: Members Posts: 1,425 Joined: 19-March 13 From: Pittsburgh PA Member No.: 15,674 Region Association: North East States |
Suggestion for first time installer - use a rod the same diameter as the M8 bolt, about 3” longer than the bolt. Thread the end M8 and screw it into the assembled mount (#20 and associated parts). Let this rod dangle down through the assembled mount. Use this rod through the hole in #13 as a guide as you raise the engine up into position. Once raised into position, unscrew the guide rod and replace with the bolt #21. Voila
|
|
|
|
| porschetub |
Apr 1 2026, 01:24 PM
Post
#8
|
|
914 Guru Group: Members Posts: 5,063 Joined: 25-July 15 From: New Zealand Member No.: 18,995 Region Association: None |
QUOTE(gereed75 @ Apr 1 2026, 04:05 AM) Suggestion for first time installer - use a rod the same diameter as the M8 bolt, about 3” longer than the bolt. Thread the end M8 and screw it into the assembled mount (#20 and associated parts). Let this rod dangle down through the assembled mount. Use this rod through the hole in #13 as a guide as you raise the engine up into position. Once raised into position, unscrew the guide rod and replace with the bolt #21. Voila (IMG:style_emoticons/default/agree.gif) that works ,I used a long screw driver to same effect ,my engine is rock solid with NOS rubber front mount but I did also rear g/box mounts with HD 911 ones , it all helps . Engine fitted fine and engine tin was right for perimeter seals , cheers. |
 |
|
| 930cabman |
Apr 1 2026, 04:14 PM
Post
#9
|
|
Advanced Member Group: Members Posts: 4,571 Joined: 12-November 20 From: Buffalo Member No.: 24,877 Region Association: North East States |
QUOTE(gereed75 @ Mar 31 2026, 09:05 AM) Suggestion for first time installer - use a rod the same diameter as the M8 bolt, about 3” longer than the bolt. Thread the end M8 and screw it into the assembled mount (#20 and associated parts). Let this rod dangle down through the assembled mount. Use this rod through the hole in #13 as a guide as you raise the engine up into position. Once raised into position, unscrew the guide rod and replace with the bolt #21. Voila Great idea, thanks. I installed mine a couple years ago and recall it was challenging. Will need to recheck and confirm all is good |
|
|
|
|

|
Lo-Fi Version | Time is now: 1st April 2026 - 04:23 PM |
Invision Power Board
v9.1.4 © 2026 IPS, Inc.